Welcome

. . .
Showing posts with label hiking. Show all posts

Saturday, July 27, 2019


I first heard of Kyrgyzstan as a hiking destination during a road trip through Armenia. A UK couple who was also traveling through educated us on what we were missing out. Three months after that, I was landing in Bishkek.

Compared to some of the more "established" hiking destinations, Kyrgyzstan is still in its infancy, which means that even during peak season the crowd density is relatively low. I went in early July and barely saw anyone on the trails (most of the people I encountered were at the camps).

So, onto Ala-Kul, which is one of the more popular hikes and relatively accessible. Most will do this across three days / 2 nights, some will do it over 2 days / 1 night, and a few will do it in one day.
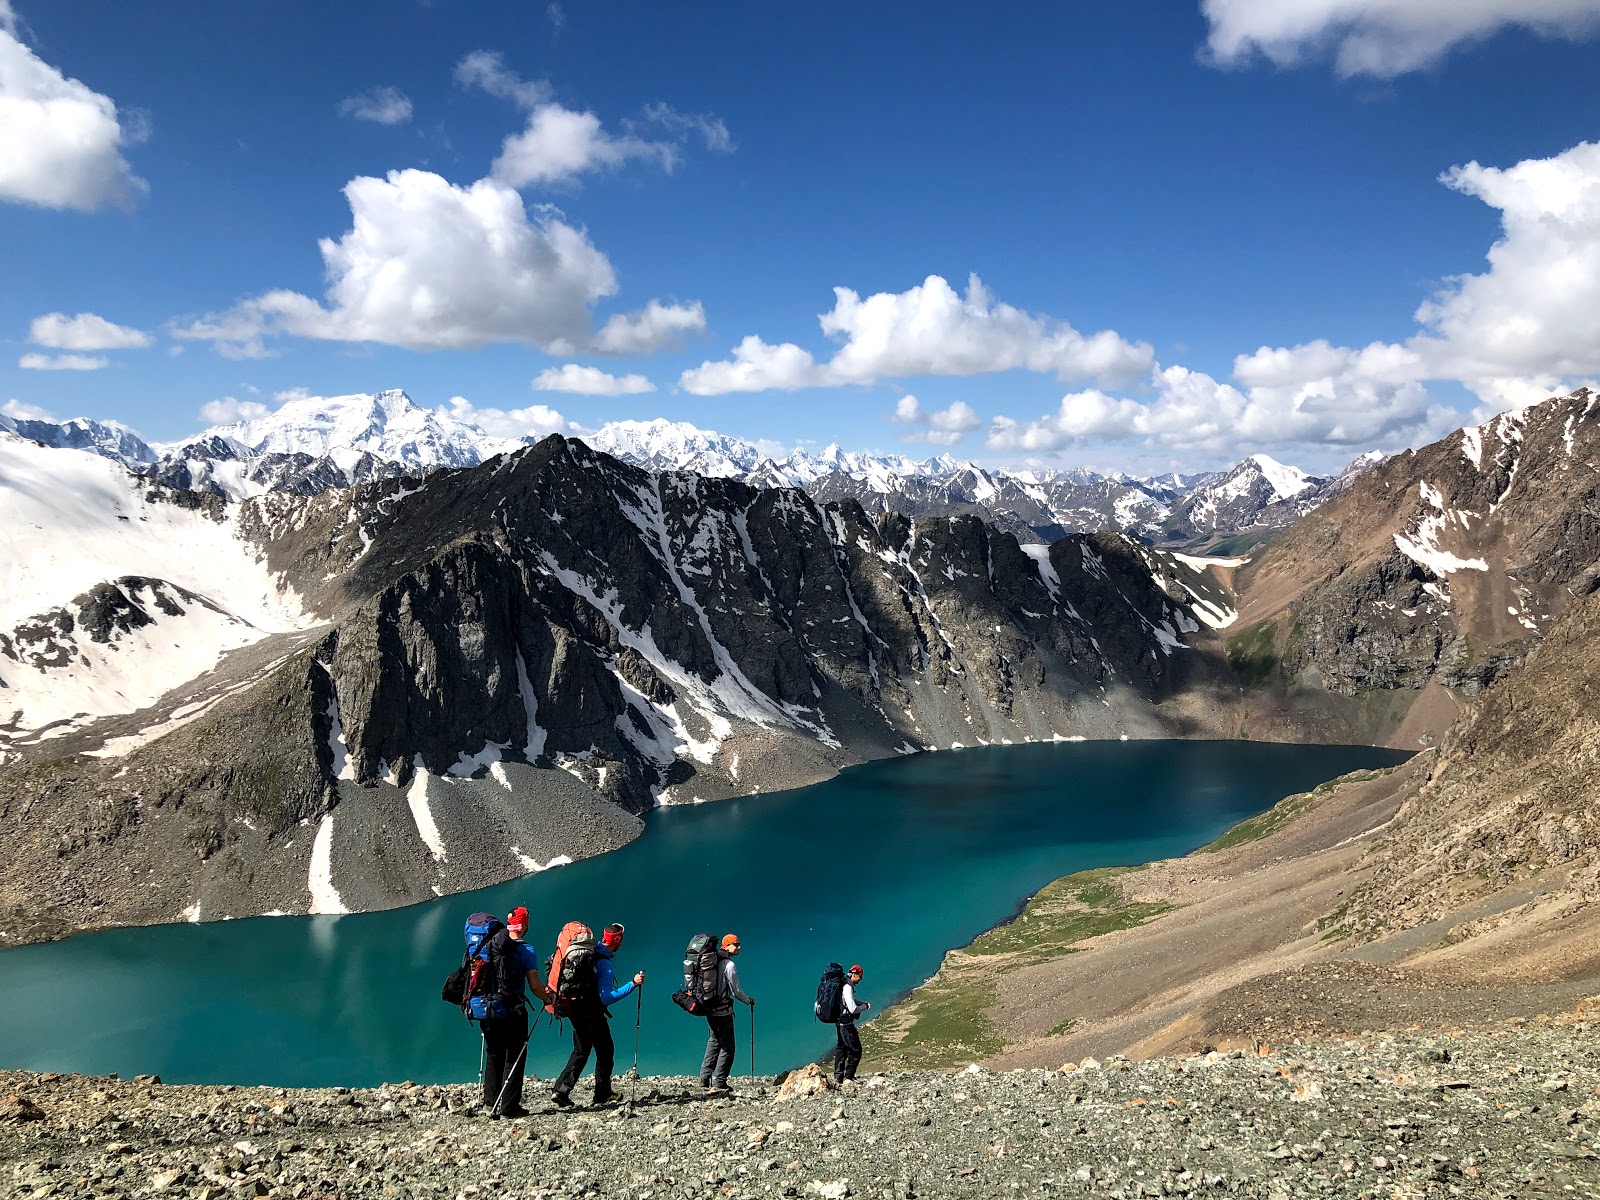


WHAT YOU SHOULD KNOW

The trail: the typical route goes like this - Karakol - Sirota Hut/Camp (night one) - Ala-Kul - Altyn Arashan (night two) - Karakol

How to get to the trail head: assuming you're already in Karakol (check out Destination Karakol for instructions on how to get there), you'll need to hop onto marshrutka #101. According to wikivoyage, the marshrutka's route is: Zhamansariev Str. - Toktogula - Lenin street - Kapacaeba - Masaliev Str. down to the entrance of the park

How to get back to Karakol: about 3 hours or so after leaving Altyn Arashan, you'll eventually hit tar again. If the marshrutkas are still running by the time you get there, the #350 will take you back to Karakol. For me, I bumped into a local who was tinkering around with his car and negotiated a ride back to Karakol as I didn't know when the next marshrutka would come by (if at all)

Can this be done in 3 vs. 2 vs. 1 day(s): this will largely be dependent on three factors

  1. Weather and trail conditions: mountain weather can change at the drop of a hat, and will either slow you down or help you along.
  2. Your own fitness and ability (mental and physical): some part of the trail is pretty laid back and you can do it without breaking a sweat. Other parts of it will require a bit of stamina to get through. I finished the first day portion of the trail in about 5 hours; and wrapped up the second day relatively quick as well, so decided to tackle the third day's portion on the same day.  
  3. Your route: the time can be truncated if you take a few shortcuts. In particular, you can hire a car to drive you past the early section of the trail (which takes about 1-2 hours of walking). You can also skip the third day's hike by taking one of the shuttles from Altyn Arashan. I don't know much about these, but saw a number of them driving past me!

How to book your yurts if you're not camping: I contacted Destination Karakol to help with the bookings. It was pretty straightforward. There is one yurt (Sirota) before the hike up to Ala-Kul, and plenty at Altyn Arashan. If I were to do it again, I would have brought a tent and camped up at Ala-Kul (the weather would have been a chillier but the setting would have been unbeatable)

How much does it costs:

  • Marshrutka #101 to the trailhead: 10-20 SOM
  • Park entrance: 250 SOM per person + 150 SOM per tent if you're bringing one in
  • Marshrutka #350 to Karakol: 30-50 SOM
  • Taxi to Karakol: 400 SOM
  • Yurts: 1000-1250 SOM per night (including dinner and breakfast)
  • Snacks: well, that's up to you and how much you want to carry

How to not get lost: the majority of the trail is pretty straightforward. For the rest, download maps.me to follow the trail. It worked like a charm for me offline

My top tip: start as early in the day as you can. I had blue skies and sun on both mornings, but by the time the afternoon came around, it changed it dark clouds and plenty of rain


For more photos: follow me on Instagram @minhchau.me

Remember: hike at your own risk as your safety is your responsibility.

Wednesday, April 13, 2016


Since coming to London I've been itching to explore Europe's hikes. But unlike many of the trails in the US it's been a bit more difficult in finding details about them online, so I'll try and do my part in bringing some of the information together. Here's a first stab with Norway's Preikestolen (Pulpit Rock).

About Preikestolen
Formed 10,000 years ago by the physical fortitude of a glacier minding it's own business, Pulpit Rock is a 25x25m flat shelf located in Rogaland County. It stands just about 604m above the Lysefjorden.


About the hike
It's only roughly 3.8km from the trailhead to Pulpit Rock with a net vertical ascent of ~334m. This doesn't sound like much, but the  trail ripples up and down quite a bit so it's slightly misleading to just look at the 334 number. Overall, it's a well marked trail (follow the red "T") and whether it's a tough hike depends on the weather conditions.

There was still snow and ice in the latter part of the trail when I went. I'm not a big fan of hiking in snow and ice - mostly because I'm always thinking I'm going to slip and slide. And of course that's what happened. 


When I was returning from Pulpit Rock I took the "Hill" path, which was mostly still covered in snow and ice, a fact I discovered as I slowly meandered my way out. I lost count the number of times I heard the unforgettable sound of ice slowly cracking beneath my feet, followed by a few brief expletives. The Hill trail rejoined the main path at kilometer 3 (or technically that's where it starts off). That was where I saw this sign:


In total it was about 2 hours up and 2 hours down.  See photos of my hike here.

When I went
Early April 2016. I kicked off from the trailhead at 8:30, which meant fewer people at the top once I got there. There was a constant stream of hikers on their way as I was returning so I can only imagine how crowded it was later in the day.

Weather that day
Temperature: Min  -2.8°C  Average  2.8°C  Max 9.2°C. Clear blue skies, little wind. No precipitation.

How I got there
A short 80 minute flight from London to Stavanger.  From the airport I took the flybussen to get into the city (180 NOK RT). The bust stop is just to the right of the exit.  In Stavanger, I hopped on the 30 minute ferry to Tau (52 NOK one way) followed by a ~25 minute bus ride to the trail head (175 NOK RT). Both bus and ferry accept cash and credit card (sorry, no Amex).

Where I stayed
Airbnb

Other useful links
Visit Norway (for alternative and off season transportation options)

Remember: hike at your own risk as your safety is your responsibility.

Monday, July 13, 2015


A few days in Virginia - more photos here.

Monday, June 29, 2015


For the visually oriented, skip straight to the pictures here.

After the Half Dome hike yesterday I wanted to give my legs a rest. At the same time I didn't want to drive all over Yosemite for a series of short hikes. I was thinking about going to Upper Yosemite Falls, which is only 7.6 miles round-trip, but it apparently consists of a lot of steps. My knees vetoed that option. Instead, I went for the Four Mile Trail, which is kind of misleading because it's more like the 4.7 Mile Trail (or 9.4 miles round-trip).


I originally thought about parking my car at the Visitors' Center and then taking the shuttle to the trailhead, but the El Capitan shuttle didn't start until 9AM. I didn't want to sit around the Visitors' Center for an hour so I went off on my own. I started from the trail at 8:30, so the temperature was still cool.

A series of switchbacks slowly took me above the treeline and lo and behold the great Yosemite Falls was in the distance. It was a pretty sight - too bad I only had my wide angle lens with me so I couldn't zoom in on it. I seared it into my memory instead.


Continuing up I eventually reached the trail gate, where the view opened up even more. Now the Half Dome and North Dome, as well as Tenaya Canyon and the Royal Arches were all visible. By then I started to feel a slight fatigue to my calves from the Half Dome hike yesterday. But as I was already ~2.7 miles in, it would have been silly to turn back. Onward I went.

The last fifth or so of the trail flattens out and leads into the forest before opening back out onto Glacier Point. The crowd factor suddenly jumped from zero to a hundred. Since Glacier Point is accessible by car, a lot of people just drive there. There was also a crew there filming an ad for the state of California. So it was a party up at Glacier Point.

Here are some of the views from 7,200 feet up:


There's a shuttle that goes from Glacier Point back to the Four Mile trailhead, but that's $25 a head. Heck no. 

See photos of my Four Mile Trail hike here.

Total miles walked today: ~9.4
Total water drank today: a rainfall x 2

Four Mile Trail Summary
Difficulty: Like drinking bad coffee - hard but doable
Length: ~9.4 miles
Altitude change: ~3,200 feet 
Time: On average, 6 hours. I was up in 2 hours and down in 1.5 hours (mostly driven by my suddenly overactive bladder).
Tips: If you're only going to hike in one direction, go bottom up instead of top down. Otherwise, the views get more and more anti-climatic. 

Remember: hike at your own risk as your safety is your responsibility.

Sunday, June 28, 2015


For the visually oriented, skip straight to the pictures here.

Yay! It's the day of the Half Dome! I've read a bit about the hike and was pretty excited to do it, both for the challenge and the views up top. It was going to be a long day. My alarm went off at 4AM and I was in my car by 4:30AM, at the parking lot near Curry Village by 7AM, and at the trailhead by 7:30AM. With my 15-pound backpack tightly strapped on, I headed off.


The ~7 mile one-way route, starting at the Mist Trail, is broken up by a series of landmark stops, beginning with Illilouette Fall followed soon by the Vernal Fall Bridge about 0.8 miles in. However, as I approached the trail leading up to Vernal Fall, I realized why it was going to take me longer than I thought. Steps! As someone with a height disadvantage (read: short legs), hiking up giant steps, to put it frankly, simply suck. It gave me immediate flashbacks to my Lost City trek in Colombia's jungles. Except the humidity was only ~17%, not 100%. I refilled my water bottle here and continued onward to the top of Vernal Fall, followed by Nevada Fall. I got lost a bit and had to climb a couple boulders, but hey, I never said spatial orientation is one of my strengths. The misty spray of Vernal Fall was a welcomed cool down. But also as a result of the spray the steps are very slippery, so take it easy if you find yourself here.


By the top of Nevada Fall the trail had been pretty much either steps or uphill inclines. But, at Little Yosemite Valley hikers get a short mile reprieve of flat flat flat land. At the top of Nevada Fall, the trail actually switches from the Mist Trail to the John Muir Trail, which is the route used by mules and horses. Hence all the crap on the trail. Watch your step as they say.

After the relative plateau is another stretch of hills until the trail takes you out of the forested area and into the open blue sky. Another short stretch later is the Sub Dome, which to me sounds pretty ominous. At the base of the Sub Dome is a ranger checking for permits. No permit, no go. The Sub Dome is the "hump back" of the Half Dome. The route up it is a series of very narrow switchbacks that sometimes disappears and you have to make your own path by climbing up boulders. Luckily, the steps are small so they weren't a problem for me. It was during this section of the trail where I started seeing people turning back out of fear and anxiety. A couple folks were on their butts slowly making it back down. Caution is a virtue here because a sudden and even minor dizzy spell can mean falling off the edge. Since I was carrying a heavy backpack. I tried to keep my back facing the dome so if I fell backwards, it wouldn't be to my demise. Big tip: don't look down! At least not unless you're on steady footing or sitting down.

After making it up the Sub Dome, the final ascent to Half Dome was in full view. And boy, it was quite the sight. If there ever was a time when I almost turned around it was then. The 400-foot vertical climb up consists of nearly 70 pairs of poles anchored into the side of Half Dome with wooden boards connecting each pair of poles (so you can stand and rest at each pair). The first couple pole-pairs are on a low incline but they very very very quickly turn steep to anywhere, I'd guess, between 45-60 degrees upwards. While a number of people have sadly died during this segment, I reminded myself that many of the tragic deaths were likely preventable (e.g. those climbing in a rush, when the cables / Half Dome were wet, lightening was imminent, etc.). If the last sentence didn't come through, do NOT climb if there's ANY chance of rain or lightening. It's stupid and dangerous. Go with the weatherman on this one.


After a little self pep talk, I put on my climbing gloves (necessary in order to get a good grip on the cables). There's a pile of gloves at the base for anyone who didn't bring a pair. The first few meters up were cake, but then it got challenging as my arms and shoulders expressed discontent from having already carried a 15-pound pack for over 7 miles. I took my time and rested at each pole-pair before continuing. Although upper body strength is important here, so is leg strength as that helped propelled me forward. I climbed up like I was rappelling upwards, which allowed me to use the entirety of my arms to pull me up. I saw other people put one hand on each cable, which feels safer but it also means they're relying more on their smaller pectoral muscles to go up. And obviously shoes with good traction is a must. If you're wearing tennis shoes it's time to go home.


The incline decreased during the last few meters of the ascent. It was low enough that I just ran up it so I could more quickly find a place to sit and rest. Four hours later, I was finally at the top (elevation: ~8,880 feet)! Let's not think about the 3.5 hours back yet, because first, there's the 360° double-chin dropping views of Yosemite's greatest hits (see below and in the photos gallery). It's rather spacious at the top, where I wandered about for an hour before heading down.

The little blue dot at the edge of the cliff is me:


The climb down is much much much easier than the way up. I don't think I even broke a sweat going down. The technique was similar to that going up - going down like I was rappelling down, but at the same time pushing down on the cables and making sure my feet were in full contact with the dome to maximize friction. However, the actual descent took a lot longer than the ascent, because someone was frozen further down and was unable to move. No pressure to rush as the views were pretty amazing even just standing there.


On the return trip I stopped upstream of Nevada Fall to soak my feet in the refreshingly cold water. Afterwards, instead of taking the trail back down the Nevada Fall steps, I took the John Muir Trail. It's about 1.1 miles longer, but it has fewer steep steps, which are also dry (read: less slippery). The JM trail is rather boring, but is very well marked so taking the wrong path is difficult.


See photos of my Half Dome hike here.

Total miles walked today: ~16.5
Total water drank today: a rainfall x 5

Half Dome Trail Summary
Difficulty: Hard like a diamond
Length: Depends on the route, but the above was ~16.5 miles
Altitude change: ~4,737 feet
Time: On average, 10-14 hours, but be generous with your estimates. Have a hard stop for turnaround time, because hiking back in the dark probably won't be fun nor safe.
Tips: Bring plenty of water and food. Wear good gloves and broken-in shoes. Carry a flashlight and jacket in case you end up walking back in the dark, which apparently is a frequent occurrence. Be patient. Don't rush yourself or anyone else. Build your arm strength. Importantly, use common sense. Don't go beyond your limits.

Remember: hike at your own risk as your safety is your responsibility.

Saturday, June 27, 2015


For the visually oriented, skip straight to the pictures here.

Half an hour before sunrise, I hopped into my car and began the drive to Fresno, CA from Cedar City. Google was predicting ~560 miles and ~8.5 hours. It turned out closer to 11 hours. The scenery was rather uninteresting. Although, I did managed to turn my car into a gasoline mutt, putting in a gallon of gas at this station, another gallon at another, and so on for five stations in total. I did it because I didn't want to pay $4.30+ per gallon! Plus, I needed to keep myself entertained. Each station got cheaper and cheaper, but the risk of me running out of fuel got higher.

Fresno was my home base while I explored Yosemite. One of the hikes at Yosemite is the Half Dome (more on this later). Importantly, only 300 hikers are allowed on the Half Dome each day. To get permission, I needed a permit either from the pre-season lottery (which I didn't apply for) or the daily lottery (which I was gunning for). I submitted my permit request the (Saturday) morning of my long drive to Fresno, and got the permit to climb Half Dome (for Monday). So, Sunday - my first day at Yosemite - I took it easy.


The drive from Fresno to Yosemite was mostly farmlands in the early part of CA-41, slowly transitioning into a lot of circling up the mountain. Apparently that was going to be the theme of the ride. Once past Oakhurst, the town just outside of Yosemite, CA-41 enters the Sierra National Forrest. The road got narrower and snaked continuously round and round.

When I was booking my Airbnb, I chose Fresno because it was cheap and only an hour's drive away (same as Cedar City - Zion). However, I didn't know that once I arrived at Yosemite, there would be another hour's drive from the entrance to the trailheads I wanted to go to. Doh. This involved driving on even narrower "S" roads that were perpetually extending itself. Not only did the curves keep coming, but the road itself was also slanted at each turn, making it quite the fun roller coaster ride. Well, it was fun the first 20 minutes, but the number of times I had to do it over the next few days was much less exhilarating. I couldn't exactly zone out. Not that I would recommend zoning out while driving. That's just crazy.


Thirty-four miles into the Yosemite entrance, I arrived at the trailhead for Sentinel Dome. The trail's pretty easy to follow and a relatively short one. The reward is a panoramic view of Yosemite's landmarks, including Yosemite Valley, Half Dome, El Capitan, etc.


At the top of Sentinel Dome itself is the ever so famous Jeffrey pine tree that appeared in Ansel Adams' 1940 photo. It's dead now, but I'd say it aged pretty well.


I wanted to take it easy, but not that easy. On the way back down the dome, I took a detour meandering here and there for about two miles until I started getting tired. I thought that was weird since it was only about 4 miles total of walking. I had 16+ miles of hiking to do the next day! Then it hit me. To paraphrase, Billy, "It's the altitude, stupid." While the 2,470 meter elevation of Sentinel Dome is nothing compared to Huaraz's 5,000 meters, I had just come from Fresno, which stands at a mere 308 feet above sea level. Good to know.


See photos of my Sentinel Dome hike here.

Total miles walked today: ~4
Total water drank today: a rainfall

Sentinel Dome Summary
Difficulty: Easy as sitting on the couch and eating Chipotle
Length: 2.2 miles round-trip 
Altitude change: 400 feet
Time: This should be a leisurely hike, taking ~1.5 hours RT.
Tip: If you're easily cold, bring a jacket. It's windy up at the top.

Remember: hike at your own risk as your safety is your responsibility.

Saturday, June 13, 2015


Covering nearly 2,000 acres, Matthiessen State Park is a haven for those looking for an adventurous day hike. For the even more adventurous and daring types, come the day after a rainstorm as the trail will be even muddier and more slippy. Slip and slide as they say.

Some of the best parts of the park will require some getting wet as there's no way getting around the water that lie within the dell (canyon). Prepare to get muddy and have some fun!

See more pictures here.

Saturday, June 6, 2015


Whether you're a bird watcher, hiker, botanist, or a parent looking to get your kids out of the house, Cedar Ridge Preserve will give you what you need. The Preserve began with only twenty-six acres of land, but now boasts 600 acres of natural habitat with nine miles of trails that trek through the shades of native Texan trees.


A mere 20-30 minutes' drive from downtown Dallas, the Preserve is worth a half-day visit. Just make sure to come early in the morning before the heat and temperature rise. FYI, well-kept bathrooms are available at the trail heads, so don't hesitate to bring plenty of water to stay hydrated.


Saturday, August 17, 2013

Who knew there were so many trails nearby to be hiked? The weather this Saturday morning was phenomenal, especially when you compare it to the rain we were getting last week. After looking through our options, we decided to head to Falls Trail, a ~3.5 mile loop near Ricketts Glen State Park. The trails goes through 18 of 22 named falls, the highest of which reaches roughly 94 feet high.